Beauty United by P&G Launch

About a month ago, I was invited to attend the launch of P&G's new beauty blogger ambassador program; Beauty United! I cannot even tell you how excited and nervous I was from the moment I was invited to the day of the event. I was so honoured to have been chosen as one of the 30 up and coming beauty bloggers in Canada.

To give you a little more of an understanding of what Beauty United is.. it's a blogger community consisting (so far) of 30 Canadian beauty bloggers. We are all essentially given the privilege to network with one another and with beauty experts, behind-the-scenes coverage with P&G's beauty brands, new products and samples, and the honour of being chosen as a P&G Beauty United Blogger!

Photo Credit: Msl Group

I've been wanting to tell you all about my amazing experience attending this event! This post should have been up sooner, but I have just started my 3rd year of college and it is much more work than you might think!
The bloggers who lived in the GTA were lucky enough to be picked up by taxis, and brought to the Trump Hotel, where the event was taking place. The bloggers from across the country had the luxurious privilege of being flown in and escorted to their hotel room.. yes.. in the Trump Hotel! When I arrived at the hotel, I was asked by a porter if I needed to use the bathroom! Was I really walking that odd in my new heels? :p

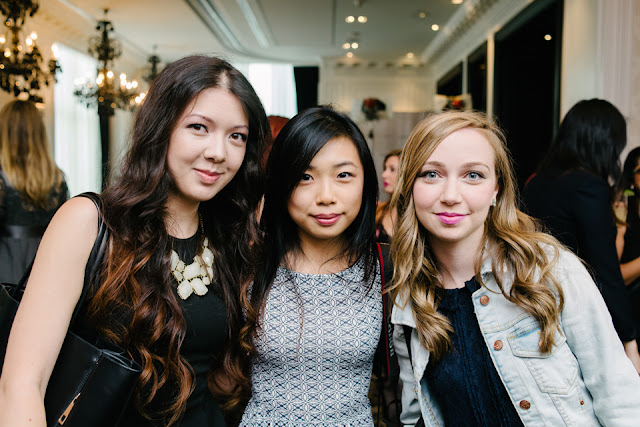
Me, Steph of Fun Size Beauty, Christine of Little Red BowPhoto Credit: Msl Group

At the event I was so happy to see Steph and Christine, who I had met earlier in the year at the Blush Pretty Beauty Board. I was super nervous.. so seeing people that I had previously met was very comforting! We mingled and got to know many of the other beauty bloggers, while enjoying the delicious chocolates and appetizers being brought around.

Me, Steph, Christine, and EstherPhoto Credit: Msl Group

We then proceeded to the presentation room, where we were going to be taught all about skincare and studies on makeup! Unfortunately, the P&G scientists were unable to physically be with us, so they instead spoke to us through the microphone, and presented us with very informative slideshows. They were so knowledgeable, it was hard for me to keep up with the information being thrown at us! We learnt about why natural ingredients are not always the best for your skin... and we were shown studies that women were rated lower by others than themselves (ouch..) and the way they do their makeup can have an affect on whether others think you are a 'bitch' or not!

After the slideshow presentations, we were given Fall 2013 hair and makeup tips by celebrity hairstylist, Justin German, and celebrity hair and makeup artist, Greg Wencel. On the brunette model, they both explained how her slicked back hair and red smokey eye were achieved. CoverGirl's Flamed Out Shadow Pencil in Red Hot Flame was used for her eye makeup and the lips were kept soft an subtle due to it being paired with such a bold eye.
Next, Pantene and Clairol spokesperson, Denis Binet, and Fashion Week Makeup Artist Amelie Ducharme were brought in to show us another fall 2013 trend. Big, teased wavy hair, a bold lip, but subtle eyes. Denis explained how the hair was achieved, by teasing only the bottom, creating a messy but classic look.

Photo Credit: Msl Group

After the fall 2013 hair and makeup tips, we were allowed to wander the room that was set up with individual booths of P&G's different brands, and ask the experts. I wish I had taken a photo of the room, but some of the brands set up were Vidal Sassoon, Crest, Secret, Clairol, Pantene, Covergirl, Olay, Venus... 

Photo Credit: Steph of Fun Size Beauty

I met so many wonderful people at the different booths, I wish I had been courteous enough to get their names! I was able to capture a picture with Clairol spokesperson, Luis Pacheco, over at the Clairol booth! I wanted hair colour advice, and was told my natural colour was beautiful and to stick with it! (I didn't listen.. my hair is red now!)


Some Instagram photos above to help sum up the night! I got to meet the lovely and super friendly, Aleeza of Stylish and Literate, who I have been a fan of for quite some time! 


This was truly an amazing experience for me.. I never thought I'd have been chosen for such a special event like this. I had such a fun time and I hope to see all of the wonderful people I met at the event again! Thank you to Jenn of MSL Group, and P&G for finding and inviting me to this wonderful Beauty United community.


Ps. we got 2 bags full of goodies! I cannot wait to begin sharing them with you all :)

Disclosure: I am a #BeautyUnited blogger. As part of my affiliation with this group I receive products and special access to P&G events. The opinions on this blog are my own.

Missed out on the Phillip Lim for Target Collection? Here are Some Affordable Alternatives

What were you doing yesterday morning? I was sound asleep, but many of you fashionistas all over Canada and the US were lined up for the launch of the Phillip Lim for Target Collection at Target! I sadly didn't even know about the collection until I woke up that morning, which of course by then, was already way too late. 

I had never paid much attention to Phillip Lim's designs but spent all day yesterday looking at them. I checked out Kijiji and eBay, and unsurprisingly found tons of resellers of the entire collection. To be honest, I was kind of mad at first, but I realized that you can't really blame the resellers. Target should know that this happens, and if they wanted to, they would offer more stock... especially in places where online shopping is not offered yet, like Canada. Ok so enough of my rambling, I basically spent all evening deciding whether to buy a 300% marked up bag! I decided to wait, and attempted to find lookalikes on the internet. I found quite a few and wanted to share them with you guys that weren't lucky enough to grab a Target one yesterday (which btw, are not real leather!).


1) JustFab Petite Midtown ($40)
The cheapest and my favourite, is this super mini version from JustFab! It comes in both black and red and I just ordered this last night! I'll update how I like it once I receive it! I received it and I love it! It's tiny but enough space for the essentials, although the only downside is no zipper! For Canadians it actually comes out to roughly $52, which is kind of pricey but I had a credit so it was worth it for me. I'd actually prefer this lookalike over the Phillip Lim for Target mini.... JustFab actually had a bigger-sized version of this bag but it isn't currently in stock :(
Ps. please please use my referral link if you aren't already signed up for JustFab and want this bag!

2) Daily Look Zippered Shape Shifting Handbag ($60)
This is my second favourite and the second cheapest! It comes in black and cognac, and is regular sized as opposed to the first one from JustFab. I like that the zippers are on the sides of this bag and you can always add strings to the zipper pulls, to make it look closer to the real thing!
Psst! It be appreciated if you could use my Dailylook referral link as well if you want to sign up!

3) Deena & Ozzy Vegan Leather Winged Tote Bag ($70)
I'm not much of a fan of this one, but I thought it was a good alternative that had silver hardware. Actually, you might have to double check with their CS as I can't really tell if the hardware is silver or gold! The bag itself isn't made of real leather so don't be fooled by the title. Vegan leather is animal-friendly and made out of synthetic material!

4) Zara Trafaluc Messenger Bag with Zips ($70)
I thought this one was pretty basic and classy! It comes in black and multicolour. The multicolour looks pretty interesting on their website, but I do not know if the colour is the same in person! It is made partly of reconstructed leather as well.

5) Zara Leather City Bag with Pocket and Zips ($180)
The most expensive lookalike that I found, but also composed of 100% cow leather. I like how Zara put a bit of a twist on the design and had the zippers only go up the bag halfway. The only drawback is the higher price, but this is also the only real leather lookalike I could find!

Alternatively, if you still want a Phillip Lim for Target bag (which, I don't blame you for! I might even pick up a large taupe one myself if I can) there is always Kijiji for Torontonians and eBay for the rest of the world!

Did you find this post helpful? Are you interested in purchasing any of these bags? Or did you line up for Phillip Lim for Target? What was your experience like?
xox.

Fashion Magazine Beauty Panel: How to Wear Red Eyeshadow


I'm so excited to share with you all that I am now apart of Fashion Magazine's Beauty Panel! If you don't know what the Beauty Panel is.. it's exactly what it sounds like! A panel consisting of many beauty bloggers who choose to partake in weekly challenges to bring you a variety of looks, tips and tricks! This is the second challenge that I've participated in! You can see the first, about transitioning your makeup from summer to fall here.

This challenge is all about how to wear red makeup... more specifically, red eyeshadow. I know I had trouble with this trend when I was younger. I actually tried to wear red lip liner on my eyes, and it would smudge like crazy! Anyway, I hope you enjoy my look below and if you have any questions or feedback, I'd love to answer them in the comments below! :)


If you’re afraid of wearing red makeup, know that you’re not alone! Red makeup is probably one of the hardest colours to wear on your face, and especially on the eyes. I hate to say it, but I have a fear of red lips. A bold red just doesn’t suit my full lips or skin tone, but I am slowly trying to get into it! Because red makeup is trending for fall, I created a smoked out look on my eyes using Cover Girl’s Flamed Out Shadow Pencil in “Red Hot Flame” as my base, all over the lid. I then used a few browns from The Balm’s Meet Matt(e) Nude Palette in my crease. Applying browns over Cover Girl’s Shadow Pencil in the crease gave it a dark burgundy tone. I also added a shimmery burgundy from my 252 Coastal Scents Palette over the lid which reminded me of red velvet cake and added a bit more vibrance to the look! You can also apply Nyx’s Eyeshadow in “Fahrenheit” over the Cover Girl Pencil to achieve the same colour on the lid. Lastly, I applied Nyx Jumbo Pencil in Milk in my inner corners, and Smog by Urban Decay on the bottom lashline in the outer corners. I completed the eyes with my ultra thin eyeliner and waterproof mascara. I finished the lips with a hint of coral, using L’Oréal Colour Riche Lipstick in “Sunset Angoria.”

Products used: Cover Girl’s Flamed Out Shadow Pencil in “Red Hot Flame,” The Balm Meet Matt(e) Palette (Crease), 252 Coastal Scents Palette (1 Colour), Nyx Jumbo Pencil in “Milk,” Urban Decay Smog, Cailyn Black Gel Liner, Maybelline Rocket Volume Waterproof Mascara, Revlon Colorstay ‘Buff’, Nyc Bronzer ‘Sunny’, Nars Blush ‘Orgasm’ and L’Oréal Colour Riche Lipstick in “Sunset Angoria.”

Please check out the other Beauty Panelist's posts for more tips and tricks for wearing red eyeshadow here!

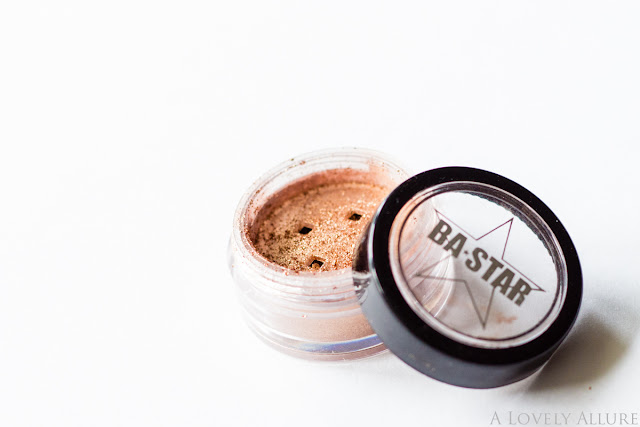
BA Star Stardust Mineral Eye Shadow in Bronze + Glitter Glue Review


I was recently given the opportunity to try out 2 products from BA Star Makeup. Although I have only heard of this brand before through a few bloggers, BA Star is said to be very popular with cheerleaders, dancers, and performers. Their product focus is on high-pigmented makeup and lots of glitter!


The Mineral Eyeshadow Stardust I received was in Bronze. I was surprised at how pigmented this eyeshadow was. My first impressions were that it is very sparkly and glittery! It seems to be a golden bronze, and It definitely pops on the eyelid, and reflects off of light so easily. I can see why it would be great to wear while performing. It is definitely a different kind of bronze than Maybelline's 'Bad to the Bronze' Color Tattoo. It is much lighter, golden, vibrant, and way more sparklier (whoa). I had to apply this before foundation because I knew the glitter would get all over my face (I was prepared this time). I just pat it on my lid, and then blended a darker brown into my crease. I love how sparkly it is and it lasted throughout the majority of the day.


The glitter glue is nothing too special, but it does do a decent job of holding the colour for the majority of the day. You definitely do need to wear the glitter glue or some sort of primer with the mineral eyeshadow, or the colour won't show up strong enough and definitely won't last. Without primer/glitter glue it will just wipe away and leave you with sparkles everywhere! It lasted about 6-7 hours before creasing with the glitter glue, although I wasn't too fond of the glue-like scent it had. It felt cold and wet when applied, and just the fact that it looks like glue makes me uncomfortable to regularly use this on my eyelids. It claims to be sweat-resistant and non-sticky, and while it did hold up for the majority of the day, it rubbed right off with water. It was a little sticky on my lids, but was fine after I applied the eyeshadow. I actually found my Urban Decay Primer to hold the colour longer than the glitter glue did, and it stayed on when I rubbed it with water, unlike the glitter glue. But.. the glitter glue made the colour stand out a lot more.

Because the bronze colour is so versatile, you could also use this as a body shimmer on your shoulders, or wherever you want a little bit of sparkle!
As you can see below, the glitter glue worked the best with the mineral eyeshadow, but it rubbed right off with water. It barely rubbed off when I used the Urban Decay primer, but the colour is not quite as vibrant.

Primed with BA Star Glitter Glue, BA Star Mineral Eyeshadow in Bronze on the lid, Brown from The Balm's Meet Matt(e) Nude Palette in the crease

If you weren't really fond of this colour, there are 8 other shades to choose from on their website, some of which are a deep purple, dark brown, or silver. They all sit at the same price of $8.75, and if you order 6 or more, they are only $5 each. However, shipping to Canada is with UPS and very pricey starting at $19.37. Shipping within the US is also a little pricey at $12.71. Hopefully, we will see a cheaper shipping option in the future.

Ooh! But I also have a discount code for my readers! 50% off with the code: BBDUST. This might make up for the high shipping, but be sure to use it before expiry, September 30th!

Disclaimer: I received this product for my honest review through BrandBacker. All opinions stated are my own and are not influenced by any affiliates.

The Balm Mary-Lou Manizer Highlighter Review


I've seen so many people raving about this highlighter that I was so desperate to get it, but I wasn't willing to pay the price for it. Initially, I bought Hard Candy's Tiki because I've heard it's a great dupe, however, I don't find it to be much of a dupe at all. The Balm Mary Lou Manizer feels much creamier and silker, and more pigmented and brighter on the skin. It is a true highlighter whereas Hard Candy's Tiki is labelled as a Bronzer for a 'sun-goddess glow', and the colour is harder to build up and more on the orangey side. I swatched them both below:


Ingredients: Mica, Isoeicosane, Polyethylene, Boron Nitride, Polyisobutene, Pfte, Silica, Synthetic Wax, Dimethicone, Titanium Dioxide, Iron Oxides

Packaging: I'm not a packaging whore (hehe) but I do love when a product has colourful or pretty packaging! What I like about the packaging is that the compact is designed like the box it comes in, rather than just being a plain silver compact! Sorry that I don't have a picture of the box, the back of it is just as fun as the front!

How It's Used: This highlighter was designed for your cheeks, lids, or all over as a finishing touch. I personally think it works best for the cheeks/cheek bones, and anywhere else you'd like to highlight. It can also be used to highlight your brow bone, or on the inner corners of your eyes. There is more shimmer than there is colour, so I wouldn't recommend using this as an eyeshadow. Instead, maybe it could be used over a dull eyeshadow to give it some shine! I have been using this daily and I love it to highlight the bridge of my nose and my cheekbones. I use it lightly because I just want a subtle shimmer that can be seen when the light hits my face. 

Overall: This highlighter is super pigmented, creamy, and easy to apply. It seems to last throughout the day if untouched, but it is a powder product, so if you'd want it to stay even longer, maybe try a setting spray (I don't use setting sprays so I don't know how well they work, just a suggestion!). I just love how easy this is to just lightly sweep over the cheeks for a shimmery glow. It's totally worth the money and if your unsure I'd suggest swatching it at a store first!

Below, I have swatched it again for you, and took a before and after shot of my face without and then with the highlighter on my cheeks and bridge of my nose. You can't see it too well because I use it subtly but the little shimmer it adds to my face is satisfying enough for me!

Before: Full Face Makeup before Mary-Lou Manizer || After: With Mary-Lou Manizer lightly on nose and cheeks

I was lucky enough to get this highlighter on sale during The Balm's 50% off sale a while ago, but it is regularily available for $24 on their website. Although, last time I checked, their international shipping rates are extremely high, so I'd suggest Nail Polish Canada if your shopping online. Rexall also carries the line at select locations!

Have you tried this highlighter? What do you think of it? Do you have any good dupes to recommend?

Back to School: Fall Fashion Picks

For fall, print on print is in. Don't be afraid to mix up different prints, classic prints, or different fabrics. Menswear inspired pieces are also going to be quite the trend, and one of my favourites to look at, leather (but so hard for me to wear, eek!)

But for those lazy school days, we prefer to just throw on something quick, because, face it, we lie in bed for a LONG time and then are left with only 20 minutes to get ready! (Please tell me this isn't just me?) Below I have linked some basic pieces that I am lusting over for fall, that are effortless but still fashionable.

One of the things for fall I can't go without are knits! Brandy Melville brings in some amazing knits a little later on in the season. Ever since they came to Toronto I cannot resist stopping into the store whenever I'm closeby. Aritzia is another place that has some cute and girly knits. If you don't have a location near you, both of these shops have an online store.

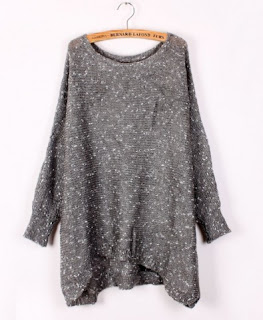
This just sold out in a small size, but not to fear! It might be re-stocked. Similar - here. Also here is another pullover I've been eyeing.

Slouchy cardigans are an end of summer/fall necessity. You have the ability to show off a cute tee, but still keep warm. The one above is from Tobi. If you haven't signed up for Tobi yet, I suggest doing it right now! They give you 50% off your first order, and if 5 of you sign up with my link, I get 50% off an order as well :)


I tend to go for open round-neckline pullovers, because I feel they look best with my neck and body shape. The first 2 sweaters above are from Chicnova, and very affordable. The grey pullover comes in neutral colours while the purple looks quite sheer and comes in either a purple, green, or orange pastel. The third pullover is made by Talula, from Aritzia.


I've been in love with Kris Tate's designs since I laid my eyes on them, and I've been holding back on buying a crewneck for so long! I think I am going to take the plunge for this fall! The interesting thing about his designs is that you can also get them on a tank top, t-shirt, pillow, as a print, or iphone case! I don't think he gets enough credit for his amazing designs.


I realized I don't own many graphic tops and I want to change that! They are so easy to just throw on with shorts or jeans, and I don't have to worry about showing my embarrassingly skinny shoulders! I saw this kitty top worn on instagram and I thought it was adorable that it is throwing a grenade (is that weird?!) Arm the Animals is the designer, who focuses on creating cute t-shirts to help generate funds for struggling small animal rescues. The second top is from Chicnova. I don't know if graphic tops with lips on it are in style, but I love how girly it is and I want one regardless! The last top is from Dailylook.


I'm slowly learning how to wear the right clothes for my body type, and I have learnt that collared blouses don't look good on me. I have a short neck and would much prefer a collar-less blouse, or a blouse with a small collar. The mint blouse is from SheInside, and I believe it is inspired by Zara. The peach top is actually a chiffon top with a cutout back from Tobi.


I think fleece jeggings are a great piece for lazy school days! They aren't too baggy, but that have that comfy sweatpant feel to it. These are from Garage, and come in a few different shades of grey.

I don't know about you, but I desperately need some new boots for fall! I have small calves, so I'd prefer boots that are adjustable at the top, so I can tighten them if they are too loose. The last pair is just a cute bootie that I think would look great casually or for a night out. These boots are actually all from JustFab. If you haven't already signed up for a membership, I would appreciate you to use my referral link here!

And finally, le statement necklaces! I think these are necessary for fall. They look great with almost any outfit and can instantly dress up look. These are both exclusively from an online jewelry boutique, LuxeCraving.

Do you like any of my picks for fall? What are your fashion picks?